Linux下vsftp安装配置
FTP 是一种应用非常广泛并且古老的一个互联网文件传输协议
主要用于互联网中
文件的双向传输(上传/下载)、文件共享跨平台 Linux、Windows
FTP是C/S架构, 拥有一个客户端和服务端, 使用TCP协议作为底层传输协议, 提供可靠的数据传输
FTP的默认端口 21号(命令端口) 20号(数据端口, 主动模式下) 默认被动模式
Linux:ftp、lftp(客户端程序)
lftp:默认是以匿名用户访问
lftp可以批量并且下载目录
Copylftp localhost:~> mirror remote local            #下载整个目录到本地
lftp localhost:~> mirror -R local remote  rename #上传整个目录到远程同时可以重命名
ftp: 默认是以用户名/密码方式访问
Windows: FileZilla、IE、Chrome、Firefox
FTP的两种工作模式
主动模式
主动模式示意图
Client打开大于1023的随机命令端口和大于1023的随机数据端口向Server的21号端口发起请求
Server的
21号命令端口响应Client的随机命令端口Server的20号端口
主动请求连接Client的随机数据端口Client的随机数据端口进行确认,连接成功
被动模式
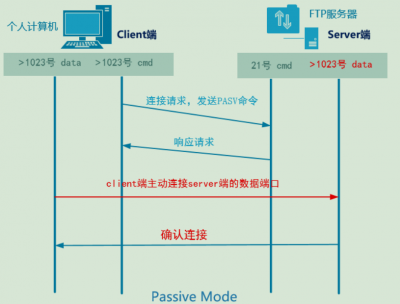
Client打开大于1023的随机命令端口和大于1023的随机数据端口向Server的21号端口发起请求
Server的
21号命令端口响应Client的随机命令端口Client
主动连接Server打开的大于1023的随机数据端口Server进行确认,连接成功
vsftp配置列表
/etc/vsftpd						//配置文件的主目录
/etc/vsftpd/ftpusers			//用户列表(黑名单)
/etc/vsftpd/user_list			//用户列表(默认黑名单|可黑可白)
/etc/vsftpd/vsftpd.conf			//主配置文件
/usr/sbin/vsftpd			    //二进制命令

/usr/share/doc/vsftpd-xxx/EXAMPLE/VIRTUAL_HOSTS
/usr/share/doc/vsftpd-xxx/EXAMPLE/VIRTUAL_HOSTS/README	//虚拟主机
/usr/share/doc/vsftpd-xxx/EXAMPLE/VIRTUAL_USERS
/usr/share/doc/vsftpd-xxx/EXAMPLE/VIRTUAL_USERS/README	//虚拟用户

/usr/share/man/man5/vsftpd.conf.5.gz			//man文档

/var/ftp			//匿名用户的默认数据的根目录
/var/ftp/pub		//匿名用户的默认数据目录的扩展目录
基本配置文件
man 5 vsftpd.conf
#####################################
grep -v ^# /etc/vsftpd/vsftpd.conf

anonymous_enable=YES	         //支持匿名用户访问
anon_mkdir_write_enable=YES      //支持匿名用户创建,修改文件
anon_other_write_enable=YES      // 同上
anon_upload_enable=YES	         //支持匿名用户上传, (默认不支持)
local_enable=YES		//非匿名用户
write_enable=YES		//写总开关
local_umask=022			//反掩码  file:644  rw- r-- r-- dir:755
anon_umask=022
dirmessage_enable=YES	        //启用消息功能
xferlog_enable=YES		//开启或启用xferlog日志
connect_from_port_20=YES	//支持主动模式(默认被动模式)
xferlog_std_format=YES		//xferlog日志格式
listen=YES					//ftp服务独立模式下的监听

pam_service_name=vsftpd	//指定认证文件
userlist_enable=YES		//启用用户列表
tcp_wrappers=YES		//支持tcp_wrappers功能

chroot_local_user=YES			//禁锢所有的本地用户的家目录

# 禁锢大部分本地用户允许小部分人可以切换跳转:
chroot_local_user=YES
chroot_list_enable=YES
chroot_list_file=/etc/vsftpd/chroot_list

# 禁锢小部分用户允许大部分用户:
chroot_list_enable=YES
chroot_list_file=/etc/vsftpd/chroot_list
echo zhangsan >> /etc/vsftpd/chroot_list

#网络访问控制:
/etc/hosts.deny
vsftpd:all                        全部拒绝
vsftpd:all  EXCEPT 192.168.0.2    拒绝所有除了192.168.0.2
vsftpd:192.168.0.254      拒绝单个ip地址=hosts.allow文件里增加vsftpd:192.168.0.254:deny
vsftpd:192.168.0.0/255.255.255.0   拒绝某个网段
vsftpd:192.168.0.0/255.255.255.0 EXCEPT 192.168.0.254   拒绝某个网段,但是除了某个ip地址
注意:子网掩码不支持192.168.0.0/24这种写法

#固定服务器端被动模式下的端口号范围为2000~2050
pasv_max_port=2050
pasv_min_port=2000

#限制匿名用户下载文件的速率为500kbps, 最大连接数为10
anon_max_rate=500000
max_clients=10
FTP服务的访问控制
/etc/vsftpd/ftpusers			//用户列表(黑名单)
/etc/vsftpd/user_list			//用户列表(默认黑名单|可黑可白)
# user_list要成为白名单, 需要再配置文件里增加:
# userlist_deny=NO
# 注意: 如果user_list是白名单, 那么必须在该文件里的用户才可以访问ftp服务

# 默认情况下, vsftpd服务支持本地用户(/etc/passwd)访问
# 默认情况下, vsftpd服务允许匿名用户下载文件,但是不允许匿名用户上传文件
# 允许本地用户上传和下载文件, 本地用户是ftp服务端的普通用户
注意事项
# ftp-server端的数据目录要有写权限
# 匿名用户的数据根目录权限不能太大可以在数据目录下创建一个新目录解决
CentOS 搭建 vsftpd
1、YUM 安装说明
(安装vsftpd采用默认的被动模式, 在生产环境中建议使用被动模式)
#安装
yum install vsftpd db4 db4-utils ftp

# 修改/etc/vsftpd/vsftpd.conf文件名 为 /etc/vsftpd/vsftpd.conf.old
mv /etc/vsftpd/vsftpd.conf{,.old}

#man vsftpd.conf 查看选项说明
# Allow anonymous FTP
anonymous_enable=NO
# allow local users to log in.
local_enable=YES
# enable any form of FTP write command.
write_enable=YES
# Default umask for local users
local_umask=022
# allow the anonymous FTP user to upload files.
anon_upload_enable=NO
# allow anonymous FTP user to be able to create new directories.
anon_mkdir_write_enable=YES
# Activate directory messages - messages given to remote users when they go into a certain directory.
dirmessage_enable=YES

# Disable logging of uploads/downloads.
xferlog_enable=NO
# xferlog_file=/var/log/xferlog
# xferlog_std_format=YES

# Make sure PORT transfer connections originate from port 20 (ftp-data).
connect_from_port_20=YES

# If you want, you can arrange for uploaded anonymous files to be owned by a different user. Note! Using "root" for uploaded files is not recommended!
chown_uploads=NO
#chown_username=whoever

# Enable this and the server will recognise asynchronous ABOR requests. Not recommended for security (the code is non-trivial). Not enabling it, however, may confuse older FTP clients.
async_abor_enable=YES

# 设定支持ASCII模式的上传和下载功能
ascii_upload_enable=YES
ascii_download_enable=YES
#
# You may fully customise the login banner string:
ftpd_banner=Welcome to FTP service.

# You may specify an explicit list of local users to chroot() to their home directory. If chroot_local_user is YES, then this list becomes a list of users to NOT chroot().
# Warning! chroot'ing can be very dangerous. If using chroot, make sure that the user does not have write access to the top level directory within the chroot
chroot_local_user=YES
#chroot_list_enable=YES
# default follows
#chroot_list_file=/etc/vsftpd/chroot_list

# listen on 21
listen_port=21
# listen on ipv4
listen=YES
# listen on ipv6
listen_ipv6=NO
# 不使用vsftpd包的'/etc/pam.d/vsftpd'
pam_service_name=vsftpd.vu
# 禁止指定文件中的用户登录(高危用户)
userlist_enable=YES
userlist_file=/etc/vsftpd/user_list
tcp_wrappers=YES
use_localtime=YES
# 启用非匿名用户的映射
guest_enable=YES
# 非匿名用户登录后被映射的用户,OS中必须存在此用户不然及时用户名密码正确也登录不进来
guest_username=ftp
# 定义每用户的设置
user_config_dir=/etc/vsftpd/vconf
virtual_use_local_privs=YES
pasv_min_port=10060
pasv_max_port=10090

############################################################################################################
#建立独立pam认证模块

# /etc/vsftpd/vuser.db (去掉.db)
cat >/etc/pam.d/vsftpd.vu <<'EOF'
auth required /lib64/security/pam_userdb.so db=/etc/vsftpd/vuser
account required /lib64/security/pam_userdb.so db=/etc/vsftpd/vuser
EOF

#ftp匿名账号和目录
mkdir -p /data/ftp
usermod -d /data/ftp ftp  #修改ftp用户家目录
chown -R ftp:ftp /data/ftp

#添加ftp虚拟用户

# 准备固定格式的文本用于生成认证文件(用户名,密码分别一行)
cat >/etc/vsftpd/ftpuser.list <<'EOF'
ftpuser
123123
EOF
# 生成认证文件
db_load -T -t hash -f /etc/vsftpd/ftpuser.list /etc/vsftpd/vuser.db

# 配置虚拟用户,一个用户一个配置文件,用户必须存在
mkdir -p /etc/vsftpd/vconf

cat >/etc/vsftpd/vconf/ftpuser<<'EOF'
write_enable=YES
anon_world_readable_only=NO
anon_upload_enable=YES
anon_mkdir_write_enable=YES
anon_other_write_enable=YES
allow_writeable_chroot=YES
local_root=/data/ftp
EOF


#重启
systemctl restart vsftpd
systemctl enable vsftpd

#测试
用ftp localhost正常登陆成功即可

#配置iptables
#添加如下规则:
-A INPUT -m state --state NEW -m tcp -p tcp --dport 21 -j ACCEPT
-A INPUT -m state --state NEW -m tcp -p tcp --dport 20 -j ACCEPT
-A INPUT -m state --state NEW -m tcp -p tcp --dport 10060:10090 -j ACCEPT
2、DOCKER安装说明
docker pull fauria/vsftpd
#The image exposes ports 20 and 21. Also, exports two volumes: /home/vsftpd, which contains users home directories, and /var/log/vsftpd, used to store logs.

#When sharing a homes directory between the host and the container (/home/vsftpd) the owner user id and group id should be 14 and 50 respectively. This corresponds to ftp user and ftp group on the container, but may match something else on the host.


#1) Create a temporary container for testing purposes:
docker run --rm fauria/vsftpd

#2) Create a container in active mode using the default user account, with a binded data directory:
docker run -d -p 21:21 -v /my/data/directory:/home/vsftpd --name vsftpd fauria/vsftpd
# see logs for credentials:
docker logs vsftpd

# Create a production container with a custom user account, binding a data directory and enabling both active and passive mode:
docker run -d -v /home/data/vsftp/myuser:/home/vsftpd/myuser \
-p 20:20 -p 21:21 -p 21100-21110:21100-21110 \
-e FTP_USER=myuser -e FTP_PASS=mypass \
-e PASV_ADDRESS=192.168.2.200 -e PASV_MIN_PORT=21100 -e PASV_MAX_PORT=21110 \
 -e  LOG_STDOUT=1 \
--name vsftpd  --privileged=true --restart=always fauria/vsftpd

#4) Manually add a new FTP user to an existing container:
#chown -R ftp:ftp /home/vsftpd

docker exec -i -t vsftpd bash
mkdir /home/vsftpd/myuser \
echo -e "myuser\nmypass" >> /etc/vsftpd/virtual_users.txt
/usr/bin/db_load -T -t hash -f /etc/vsftpd/virtual_users.txt /etc/vsftpd/virtual_users.db

exit

docker restart vsftpd
This image uses environment variables to allow the configuration of some parameters at run time:
Variable name:
FTP_USERDefault value: admin
Accepted values: Any string. Avoid whitespaces and special chars.
Description: Username for the default FTP account. If you don't specify it through the
FTP_USERenvironment variable at run time,adminwill be used by default.
Variable name:
FTP_PASSDefault value: Random string.
Accepted values: Any string.
Description: If you don't specify a password for the default FTP account through
FTP_PASS, a 16 character random string will be automatically generated. You can obtain this value through the container logs.
Variable name:
PASV_ADDRESSDefault value: Docker host IP / Hostname.
Accepted values: Any IPv4 address or Hostname (see PASV_ADDRESS_RESOLVE).
Description: If you don't specify an IP address to be used in passive mode, the routed IP address of the Docker host will be used. Bear in mind that this could be a local address.
Variable name:
PASV_ADDR_RESOLVEDefault value: NO
Accepted values: <NO|YES>
Description: Set to YES if you want to use a hostname (as opposed to IP address) in the PASV_ADDRESS option.
Variable name:
PASV_ENABLEDefault value: YES
Accepted values: <NO|YES>
Description: Set to NO if you want to disallow the PASV method of obtaining a data connection.
Variable name:
PASV_MIN_PORTDefault value: 21100
Accepted values: Any valid port number.
Description: This will be used as the lower bound of the passive mode port range. Remember to publish your ports with
docker -pparameter.
Variable name:
PASV_MAX_PORTDefault value: 21110
Accepted values: Any valid port number.
Description: This will be used as the upper bound of the passive mode port range. It will take longer to start a container with a high number of published ports.
Variable name:
XFERLOG_STD_FORMATDefault value: NO
Accepted values: <NO|YES>
Description: Set to YES if you want the transfer log file to be written in standard xferlog format.
Variable name:
LOG_STDOUTDefault value: Empty string.
Accepted values: Any string to enable, empty string or not defined to disable.
Description: Output vsftpd log through STDOUT, so that it can be accessed through the container logs.
Variable name:
FILE_OPEN_MODEDefault value: 0666
Accepted values: File system permissions.
Description: The permissions with which uploaded files are created. Umasks are applied on top of this value. You may wish to change to 0777 if you want uploaded files to be executable.
Variable name:
LOCAL_UMASKDefault value: 077
Accepted values: File system permissions.
Description: The value that the umask for file creation is set to for local users. NOTE! If you want to specify octal values, remember the "0" prefix otherwise the value will be treated as a base 10 integer!
Variable name:
REVERSE_LOOKUP_ENABLEDefault value: YES
Accepted values: <NO|YES>
Description: Set to NO if you want to avoid performance issues where a name server doesn't respond to a reverse lookup.
Variable name:
PASV_PROMISCUOUSDefault value: NO
Accepted values: <NO|YES>
Description: Set to YES if you want to disable the PASV security check that ensures the data connection originates from the same IP address as the control connection. Only enable if you know what you are doing! The only legitimate use for this is in some form of secure tunnelling scheme, or perhaps to facilitate FXP support.
Variable name:
PORT_PROMISCUOUSDefault value: NO
Accepted values: <NO|YES>
Description: Set to YES if you want to disable the PORT security check that ensures that outgoing data connections can only connect to the client. Only enable if you know what you are doing! Legitimate use for this is to facilitate FXP support.
centos ftp客户端
yum install -y lftp


lftp $ftpUser:$ftpPasswd@192.168.2.101 <<EOF
mkdir ${backuptime}
put /home/mysql/${backuptime}.tar.gz ${backuptime}

bye

EOF

rm /home/mysql/backup/* -rf
echo "Upload to FTP successfully."
配置项说明
anonymous_enable=YES | 是否允许匿名ftp,如否则选择NO |
|---|---|
local_enable=YES | 是否允许本地用户登录 |
local_umask=022 | 默认的umask码 |
anon_upload_enable=YES | 是否允许匿名ftp用户访问 |
anon_upload_enable=YES | 是否允许匿名上传文件 |
anon_mkdir_write_enable=YES | 是否允许匿名用户有创建目录的权利 |
dirmessage_enable=YES | 是否显示目录说明文件,默认是YES但需要收工创建.message文件 |
xferlog_enable=YES | 是否记录ftp传输过程 |
connect_from_port_20=YES | 是否确信端口传输来自20(ftp-data) |
chown_upload=YES chown_username=username | 是否改变上传文件的属主,如果是需要输入一个系统用户名,你可以把上传的文件都改成root属主 |
xferlog_file=/var/log/vsftpd.log | ftp传输日志的路径和名字默认是/var/log/vsftpd.log |
xferlog_std_format=YES | 是否使用标准的ftp xferlog模式 |
idle_session_timeout=600 | 设置默认的断开不活跃session的时间 |
data_connection_timeout=120 | 设置数据传输超时时间 |
nopriv_user=ftpsecure | 运行vsftpd需要的非特权系统用户默认是nobody |
async_abor_enable=YES | 是否允许运行特殊的ftp命令async ABOR. |
ascii_upload_enable=YES ascii_download_enable=YES | 是否使用ascii码方式上传和下载文件 |
ftpd_banner=Welcome to chenlf FTP service. | 定制欢迎信息 |
deny_email_enable=YES banned_email_file=/etc/vsftpd.banned_emails | 是否允许禁止匿名用户使用某些邮件地址,如果是输入禁止的邮件地址的路径和文件名 |
chroot_list_enable=YES chroot_list_file=/etc/vsftpd.chroot_list | 是否将系统用户限止在自己的home目录下,如果选择了yes那么chroot_list_file=/etc/vsftpd.chroot_list中 列出的是不chroot的用户的列表 |
max_clients=Number | 如果以standalone模式起动,那么只有$Number个用户可以连接,其他的用户将得到错误信息,默认是0不限止 |
message_file | 设置访问一个目录时获得的目录信息文件的文件名,默认是.message |